Sunday, November 11, 2018

SCHervo Library and ServoTask

I made some of my usual "improvements" to the standard Arduino Servo motor control library.  Building on my Task Scheduler I've added a speed control, so the time it takes a Hobby Servo motor to move from it's current position to a new one can be controlled over a fairly large range.

It did take some reverse engineering...

The regular Servo library uses Timer 1 (on the 'standard' Arduino ATMega 328's -- I haven't worked this out all for other chips) to operate up to 8 (they say 12 but I think it gets a bit slippery after 8) servo motors. It does this by sequencing the ON pulses for each motor, one-after-the-other, which is pretty slick. Or would be IF the authors had mentioned what they were doing someplace. There's very little internal documentation -- Comments, Please! -- in the code. But I persisted.

My SCHervo library comprises a cleaned up and (hopefully accurately) commented original version, with the usual Schip Secret Sauce additions.  A simple addition is a turnOff() method which just shuts the motor off so it isn't using power trying to hold a position (or speed) that you don't care about. The more complicated addition is a Task to update the position -- and thus speed -- of each motor over a fixed interval. This allows the motor to transit in pseudo-continuous increments over a fairly extended period (up to about 1 minute). The motion is initiated using the startMove() method, can be monitored with ready() which returns TRUE when the motor has (just about) reached its new position, and stopMove() to make it stop at any time in-between.

But first lets review just this much: How do Servos work?

The basic idea is that you send the motor a positive pulse every 20mS (big T in the picture below), where the width of that pulse (little t) is proportional to the position one wants the motor shaft to take -- usually defined as from 0 to 180 degrees. Each degree position translates to a pulse width, which generally varies from 500 to 2500 micro-seconds, where 1500uS is a nominal 90 deg center position. Each motor is a bit different in it's range and widths, but that's the general scope.
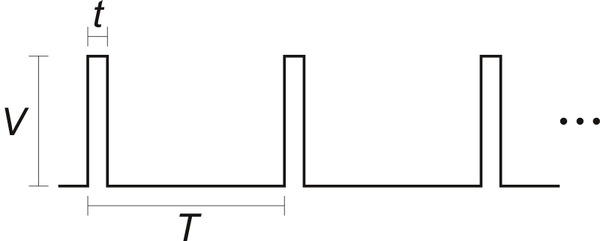
picture of a servo drive pulse train
And here is a better description.

Another thing to remember is that the motor doesn't just suddenly go to the new position, but has a finite slew rate, generally something like 60 degrees in 200mS. This works out to 5 or 6 degrees in each 20mS refresh period, which is also the fastest the motor can get any new position input.

So... If we change the delivered pulse width in every 20ms period we can control the motor's angle change speed. And that's what the ServoTask() does. Recall that all of the 8 controllable motor's pulses are sequential, stacked such that the next starts after the previous finishes, and when they are all done there is a slack period until the 20mS refresh times-out. The ServoTask() is posted from the timer interrupt service routine at the beginning of the slack period, and -- in theory -- it will execute and update the desired pulse widths for the next period.

When a motor is started using startMove( endPosition, time, offFlag ) the code calculates how many micro-seconds should be added to the current pulse width in order to transition from the starting to end positions in the given amount of time. I got a little tricky and used a Fixed Point calculation with 3 bits of "sub-precision", to handle longer moves, but that's just between you, me, and the code.

However ... Fixed Point

If you know me, you know, I can't resist a few, more, comments. The Arduino using an ATMega 328 has no hardware support for Floating Point math. Should you make the mistake of including a float value in your program the linker will pull in about 1kB of code to support it. And further, should you blunder into actually using the float in a math-like-way, the result will take (relatively) forever. It's actually even worse, as the ATMega has only a small set of 16bit integer Multiply instructions (along with ADD and SUBTRACT) and NO Divide at all.

So what do you do when you would like to maintain some fractional components in your arithmetic? Why Fixed Point of course!  I'll leave it to wikiP to explain: https://en.wikipedia.org/wiki/Fixed-point_arithmetic

The tldr; of it is that you shift int values up by a consistent number of bits, do your arithmetic, and then shift them back down when you want to get a nice truncated integer again. This needs to be done judiciously because you only gain the precision of the up-bit-shift, and this number of bits is removed from the range of your values. In the case of my 3bit FixP values using a 16bit int, you get a precision of 1/8th or .125 in decimal and a range of +/- 0 to 4096 (12 bits plus sign). Which turns out to be just fine for calculating the micro-second values needed by the servos.

TBD

Note that the old-fashioned Servo.write() interface does not provide a way to determine when the motor is (almost) done moving. My startMove() method tries to account for the slew rate during fast motions by adding some guess at the amount of time needed. But this runs into a bit of trouble from the internal motor controller, which usually treats smaller moves as slower changes (this is how you are sometimes able to get speed control from motors that have been modified for continuous rotation). This behavior also slows the motor down when using the ServoTask() incremental stepping, so the internal how-long? guess is not always right.

I could do a little more hacking to better integrate faster slews -- it shouldn't be THAT hard, heh -- and this would also eliminate the need for the 'regular' write() interface (or draw it into the fold) such that, in all cases, the ready() method will really tell you when the motor is done moving

But. Otherwise. You should be able to just go ahead and use it now...


Saturday, November 10, 2018

Possible employment opportunity!

FB is trying to help by getting me job selling popcorn! If I could only find 5 of these I could forgo my Socialist Social security....

Thursday, November 8, 2018

Program Structure

OK then. Now here's some Architecture...

I've made a template file for the Arduino main program that uses the libraries and functions that we have so recently been discussing:

    http://www.etantdonnes.com/DATA/Arduino/template/template.ino

As you know, the Arduino system shields you from some of the nitty gritty by requiring only two methods:
  • setup() -- runs once at the beginning of time (after a reset);
  • loop() -- is run repeatedly thereafter;
In my template setup() calls methods to initialize messaging, any output devices that will be used, and the ADC and other inputs:

// the setup routine runs once when you press reset:
void setup()
{
    MessageTask_init();    // init the message system
    RunTask_init();        // init the output system
    ADCTask_init();        // init the input system

    return;
}
Where those methods are declared like this:

/** Do whatever necessary to initialize the message system
 */
void MessageTask_init()
{
    // everyone uses comms
    Serial.begin( 9600 );
    // set message terminator to newline for text input
    Serial.setMsgTerm('\n');
    return;
}

// a global system state, just for Sudhu...
//  actually... to keep track of what the system is doing
word runState;

/** Do whatever necessary to initialize the system output devices.
 */
void RunTask_init()
{
    // set output modes on pins
    pinMode( BPIN, OUTPUT );
    // initialize running state
    runState = 0;
    return;
}

/** Do whatever necessary to initialize the system input devices.
 */
void ADCTask_init()
{
    // set input modes on pins
    pinMode( APIN, INPUT_PULLUP );
    // start the ADC interrupt cycle
    analogRead( 0 );
    return;
}

A word about runState ... I insist on keeping track of the internal system state in order to execute sequences of behaviors and respond appropriately to inputs. So each of my programs has a global state variable which is manipulated by all the Task functions. The use of this will be more apparent if/when we get to the actual Variations Too code, but Sudhu was always teasing me about it so he gets credit here....


The loop() function does two things. Look for messages and post the MessageTask, and then do a pass through the scheduler's list of things to do. If any Tasks are ready to run, they get executed here, and then the scheduler() returns, allowing loop() to return, which then repeats itself. Note that interrupts will execute (except for brief elisions) throughout this, so new functions may be entered on the Task list at anytime.

// the loop() routine runs over and over and again forever:
void loop()
{
    // see if we have a new message and post the receive task
    postTask( 0, MessageTask, nMsg );
    // execute the schip task scheduler
    scheduler();    // schedule the world
    return;
}

The actual tasks that will be executed are declared like this:
 /** Task posted when there is a serial input message
 * @param nmsg -- ignored...
 */
void MessageTask( word nmsg )
{
    // read the message string including '\n' terminator
    // and execute user functions
    return;
}

/** Posted from ADCTask to do something with new sensor values
 *  sState -- condensed bitmap of stuff that happened
 */
void RunTask( word sState )
{
    // look at run and sensor States and do appropriate stuff
    return;
}

/** Task posted when ADC averaging gets a new set of values.
 **/
void ADCTask( word numADC )
{
    // rummage through input stuff and set flag bits in sState
    // execute RunTask(sState) after 0 millis (like real soon now)
    return;
}
 And the rest is, as they say, just implementing stuff....


We'll talk about some of that stuff anon.

Monday, November 5, 2018

Messages

I added an a couple of interface methods to the underlying HardwareSerial class -- it's possible that I could have done this by extension rather than hacking, but it might have been even harder to integrate. The msgAvailable() method returns how many of some specified character -- which should be set using setMsgTerm(uint8_t) -- have been received. In usual practice this is a count of newlines, where a newline means that the source has completed a text formatted message. This makes certain that the receiving Arduino isn't waiting around for characters when processing messages, which is a bit of an improvement on the standard Serial.available() method.

The msgAvailable() method is probably not really useful unless you are implementing a higher speed call-and-response system of some kind. It requires some heavier internals hacking than the scheduler and ADC fixes -- which have to be done on every new Arduino version -- so I would recommend waiting until your mileage indicates that it's needed before trying it out....

But first... A little about messaging....

 I puzzled over I/O text parsing methods like Serial.parseInt() and finally realized that I could find no way to use that parsing on my own message strings. Therefore I gave in and tried to make it work as is. One doesn't necessarily need my Task Scheduler code to do this, but it fits in fairly nicely.

Each pass through the loop() method looks to see if there are some characters available -- hopefully a full message, where one could use msgAvailable() to be absolutely sure -- and posts (or just executes) a message receiving task:

    // USB message function
    // if we have a new message, post the receive task
    // if the message isn't handled by the time this runs again
    //  we will get a second Task post, so get with it...
    // here we just check available()
    //  and hope we have a whole message
    // do we have more than one char available?
    byte nMsg = (Serial.available() > 1) ? 1 : 0;
    if( nMsg != 0 )
        postTask( 0, messageTask, nMsg );
        // note that this could also just execute the method....
        // messageTask( nMsg );

When executed, the messageTask() reads and parses values from the Serial input, then executes user functions as needed.

Message Example

I usually use messages with a single character command followed by integer or string parameters, all ASCII with white-space (space or tab) delimiters, followed by a newline ('\n' in C) terminator that says it's all done, ala:

    r 1234 5678\n

The Message Task parses these parameters and get stuff rolling. Two interesting(?) things about functions like Serial.parseInt() are,
  1. They skip white-space until they find characters they like, then consume those chars until they find more white-space or chars they don't like, and stop there;
  2. If they don't find anything they like, they block for up to one second waiting ...which is annoying...

But used judiciously these functions can collect parameter values, such as:

    /** Task posted when a serial message is found
     * @param n -- ignored...
     */
    void messageTask( uint16_t n )
    {
        // get the first command character
        char val = Serial.read();
   
        // see what we got, for debugging, etc
        //Serial.print( "cmd: " );
        //Serial.print( val );

        // Perform an action depending on the command
       switch( val )
      {
         case 'r': // run
         case 'R':
           // collect a variable number of arguments
           // -- up to 10 before crashing --
           // assuming that only space is used as a delimiter
           // and not handling trailing spaces very well at all...
           // ... if the next char is a space
           //   presume we have a new parameter...
           int args[10];
           byte count = 0;
           while( Serial.peek() == ' ' )
           {
                args[count] = (char) Serial.parseInt();

                // optional debuging
                //    Serial.print( ' ' );
                //    Serial.print( args[count] );

               ++count;
          }

          // do something with it all...
          runMe( args[0], args[1], ... );
        break;

        // .... //

        default:
            ; // de Nada
      }

      // optional debuging terminate
      //Serial.println();

      // consume anything else including the terminator
      // note: this is important, so we don't get called again
      // with just the terminator in the message input buffer
      do
      {
           val = Serial.read();

      } while( (val != '\n') && (val != -1) );

      return;
    }

Status Return

For return status messages the same format can be used and the Serial.print() or printf() functions work fine. It's not imperative that you use the newline terminator but it probably makes things much easier at the other end.

So there you go...

I've putzed around with raw binary (non-ASCII) messages, but the parsing is less flexible, terminators are hard to come by, byte ordering can still be problematic, and just plain text is much easier to monitor on the host side during development.


Next we'll look at the overall program structure.

Sunday, November 4, 2018

Analog to Digital!

When Worlds Collide

Another "feature" of my new improved Arduino architecture is ADC access...

Interrupts

Due to my antipathy for busy waiting -- rather than looking busy I'd prefer to just not do anything -- I implemented an interrupt driven ADC interface.

In the standard Arduino system, calls to analogRead() execute a conversion in place (and block for the time it takes to complete). In my new improved system, conversions free run at the slowest rate available on the Atmega chip in the "background".  And the standard interface calls are redefined to just return the most recent value from the requested channel. This takes a bit of processor -- not user -- attention but makes the getting of values almost immediate.  If one is doing data acquisition one is probably getting ADC values fairly frequently, so it's likely the number of instruction cycles tradeoff is not a big issue.

The number of channels accessed by the background conversion cycle can be set in the schip_analog.h file. Usually 4 is sufficient, but a total of 8 are available on many Atmega chips. Note that I2C communication uses A4 and A5, so if you need them there is a provision for skipping those channels in the sample loop.

ADC Task

A second feature of my interrupt driven conversion code is an averaging algorithm which squeezes 64 samples into one smoothed 8-bit value. This allows a lot of noise and nonsense to be filtered out of the individual conversions. Specifically, for instance, 50-60Hz hum... These values are accessed using analogReadAvg() which will return the most recent average for each channel.

When enabled, the averaging cycle also creates a reasonably timed -- in the multi-millisecond range -- repetitive sample cycle. At the end of each averaging period the ADCTask( num_channels ) function is posted to the task scheduler, which will then execute it very close to the time that all the channel averages become available. The exact timing of this posting is determined by the number of ADC channels being converted:

For the Arduino Uno and PRO-Mini with a 16Mhz Atmega 328, the ADC prescale is set at the maximum 128 clocks, and a single ADC conversion takes about 110uS

With NUM_ADCCHANNEL set to 4:

A four channel ADC cycle takes about 450uS (2222Hz sample rate) so 64 conversion cycles takes about 29mS.

The Leonardo seems to be a bit slower:

A single ADC conversion takes about 120uS, and a four channel ADC cycle takes about 480uS (2085Hz sample rate) so 64 conversion cycles takes about 30.7mS.

With NUM_ADCCHANNEL set to 8 and SCHIPSKIPI2C defined for a total of 6 channels:

A six channel ADC cycle takes about 660uS (1515Hz sample rate) so 64 conversion cycles takes about 43mS.

Audio Data

A tertiary feature -- not used in the Variations context -- is a double buffering scheme for ADC channel 0 which allows 64 10-bit samples to be collected into a local buffer. When the buffer fills it's address is put into the global pointer SchipBUF0, from whence the user can get and manipulate the data. While the user is playing with buffer one, a second buffer is being filled and it's pointer is alternately placed into SchipBUF0. So if you can keep up, you can do some audio processing at a reasonable sample rate. See the SoundBit for an example.

The time between buffer updates and the actual rates for various configurations are listed as the conversion-cycle and sample rate above.

'Kernel' hack

In keeping with not being able to leave anything alone I have made some insertions in the core "kernel" ADC code to remove the old-fashioned analogRead() function. This is included in the "cores" directory of the code bolus. It is not strictly necessary, but is sufficient to avoid confusion and save a few bytes of program memory.

setup()

In all cases, when using the new-improved-interrupt code one needs to kick things off by calling analogRead( n ) once in the setup() method. This will usually return 0, so the value should be ignored. Too bad, in the old world we could have used the value as a random number seed but now have to find some other workaround for that.

More Anon.

Friday, November 2, 2018

Task Scheduling

At the bottom of my new-improved-code pile is the scheduler library which makes possible a semblance of non-pre-emptive multi-tasking. It maintains a list of Task functions to be executed with a single argument (which can be cast to be an arbitrary pointer) and the number of milli-seconds in the future that the function should be fired off. Using this system you will never use the busy-waiting delay() again. It is contained in the schip_scheduler library, and optimally linked through the Arduino cores 'kernel' code. See those directories in my code bolus ref'd in Software Architecture.

Task functions have the signature:

    typedef void(*PFV)(uint16_t);    // pointer to a function for task list

which looks like this when you define one:

    void myTask( uint16_t arg ) { return; }

By default, the function list has 8 entries and attempt to enter more will fail with an error code. The size can be changed in the header file with:

    #define USE_NumTasks 8

There are four user entry points to the library:

    void initScheduler(void);

initScheduler() should be called in the setup() method before any tasks or task related interrupts are posted or enabled.

    void scheduler(void);

scheduler() should be called in the loop() method, and may be the only function there -- modulo a serial message checking block if one uses such -- see subsequent blogging about message Tasks. This is where the busy-waiting is concentrated, but it is only waiting busily when there is nothing else to do.

A task can be inserted into the list using;

    int postTask( uint16_t ticks, PFV func, uint16_t arg );

where 'ticks' is the number of milli-seconds in the future that the task should be executed, 'func' is the task method to execute, and 'arg' is an arbitrary 16 bit sized value to pass when executed, ala: func(arg). A post call might look like this:

    postTask( 100, myFunc, 0 );

It will return the task's index in the list, or -1 if it fails.

An executing task may call:

    void repostTask( uint16_t ticks, uint16_t arg );

to put itself back into the scheduler's list with the given execution delay and argument value.

There is, as of now, no removeTask(). Everything in the list gets executed when it's time comes...

A user task should not run for a long time and should never call delay() or other blocking functions as this will prevent other tasks from running. If the task is going to do a lot of nonsense it should be broken into smaller functions that post each other in succession. This allows 'background' tasks, such as ADCTask() and ServoTask() to get an execution in edgewise. All tasks run to completion in "user memory space" so there are minimal worries about concurrency. However interrupt service routines can both interrupt and post tasks during execution, so some attention should be paid to shared variables in those contexts.

There are two versions of the scheduler library. One is fully in the "user program space" and uses millis() to calculate elapsed time between calls. This has a bit more overhead and can be less precise in it's execution delays. The 'real' one can be hacked into the Arduino cores "kernel" and uses a callout from the milli() tick interrupt to manage the times in the task execution list. It is somewhat more efficient but the drawback is you have to hack it into each kernel version as it comes off the press. There is some discussion in the library header file and in the cores/readme.txt about how to install it.

A secondary advantage to the "kernel" version is that it can contain another callout to a user function on every milli() tick. And THIS can be used to implement, e.g., a stepper motor step sequence. See SCHIPTICK in the files....


Next up: ADCs

Thursday, November 1, 2018

Software Architecture

The low level controller in the Variations Too project is an Arduino, beloved by LED Flashers around the world. But my last actual job title in the Software Industrial Complex was Extensibility Architect (...see how well that went here...) so I can't leave things alone without extending upon them. And the Arduino system is badly in need of some Software Architecture. Since it's simple enough, in most respects, that I can almost understand it, that's what I've been doing by fits and starts lately.

First, there's a lot of busy-waiting going on. The Analog to Digital Converter (ADC) code just starts a conversion and sits there waiting for it to complete. This is not so bad as it usually comes through in a tenth of a millisecond, but that's about 400 instruction cycles that could be used for doing something useful.

Then... delay() is the favored way to make something happen sometime in the future. This is just a bad idea in a system that might be responding to a buncha stuff in a realish time frame.

And. Then. Speaking of responding. The "usual" way to do responsible data acquisition is to sample at some fixed rate. There is no provision for doing that in the system as it is constructed.

Plus. Communication. One often wants to send and receive messages from the rest of the computing planet in some reliable manner. Unfortunately the Serial interface has hidden it's underlying structure and parsing mechanisms such that this is difficult. Doubly impossible if one needs to implement a message format that contains framing, headers, and/or checksums, which might, for instance, be of use in less than predictable mediums like radio.

On the other hand

I was making amazing claims about the Arduino system, such as, "It just seems to work!" -- in comparison to a previous ATmega based development system, constructed by grad students that needed thesis topics, I used, lets just say, 20 years ago, where my strongly held belief was that NO ONE knew how the build system worked, such that the way to get it running was to reinstall different versions until a compile stuck to the wall. But. Of course. The one time I tried to teach a class using Arduinos, three of the six students had varying levels of failure, from port configuration (on a Mac, so, well, yeah, sure...) to execution failure (on what appeared to be a garden variety Widows machine). So I've forsworn further involvement of that nature.

But I woolgather...

Here's the latest bolus of my improvements to the world:

http://www.etantdonnes.com/DATA/schipArduino.zip

Details at 11.